
Hello!
I can't quite believe that we only have 2 days left till we move! I can't for the life of me work out where that time has gone.
Today I have hardly anything to do. Almost all of the rubbish and junk have gone, and I have run out of boxes until P comes home from work with some.
That means I've had plenty of time to write out and photograph the pattern for Crochet flower bunting!!
It's all written in UK terms.
UK tr = USA dc
UK htr = USA hdc.
ch 3 and join to form a ring with a sl st.
Round 1. Ch 4 ( counts as 1tr 1ch )

1tr 1ch 11 times into ring.
Fasten off.

Round 2.
Working between the spokes.
Join new yarn to any space.
ch3 (counts as 1tr) 2tr, 3ch, 3tr in same space.

1tr in each of the next 3 spaces.

( 3tr, 3ch, 3tr) in next space.

1 tr in each of the next 3 spaces
( 3tr, 3ch, 3tr ) in next space.
1 tr in each of the last 3 spaces. Join to 3rd of beginning 3ch.
Fasten off.
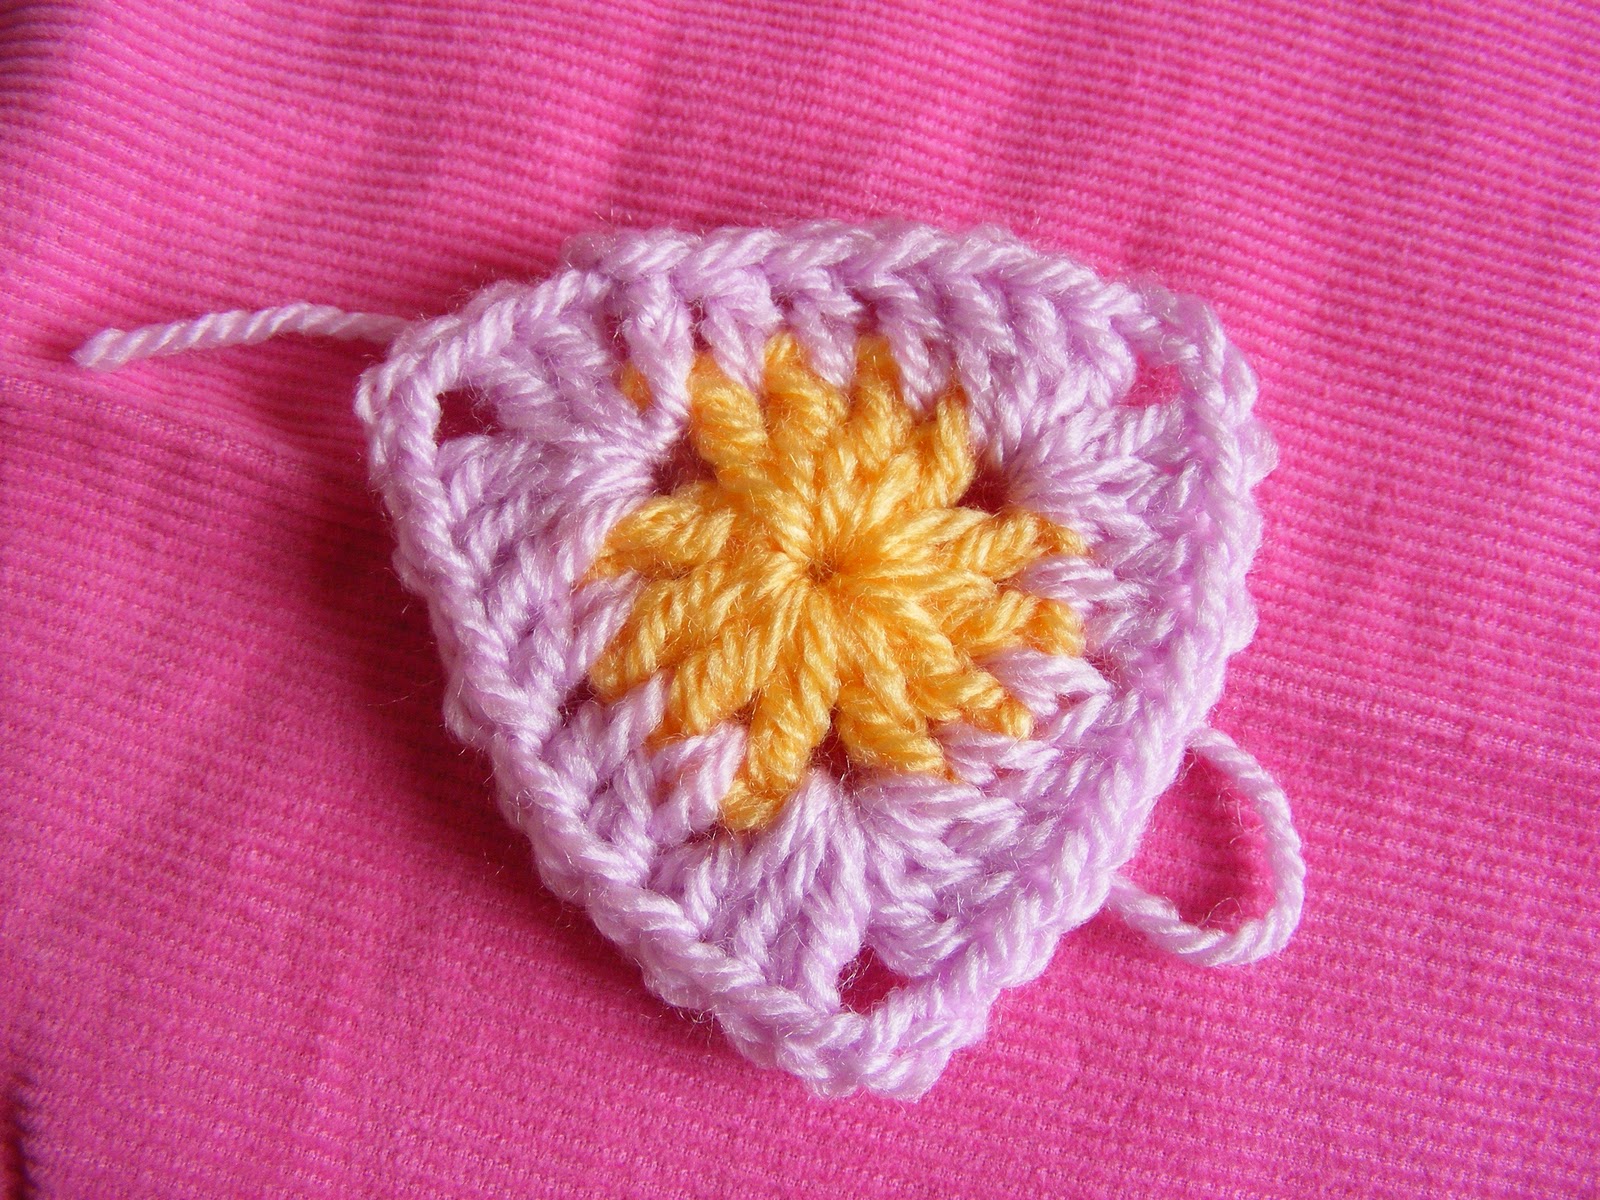
Round 3.
Working between the stitches.
Work (3tr, 3ch, 3tr) in the 3ch corner spaces and 8 tr along the sides.

Fasten off.

Round 4.
Still working out of the spaces between the stitches.
(3tr, 3ch, 3tr) in each 3 ch corner space.
13 tr along the sides.

Fasten off.
Working out of the stitches now.
Join new yarn.
1htr in each st along the sides.(19 htr)
(2htr, 1tr, 2htr) for the corners.

Fasten off.

To add flower.
You will be working out of the spokes from round 1.

Join new yarn to any spoke.
*ch1, skip 1 spoke, slst into next spoke*
rep from *to* 6 times.
Join to first st.

Do not fasten off.
In each 1ch space, work (6tr, slst)

6 petals.

Fasten off.

As per usual any mistakes please let me know and I'll amend!
Well I guess that is my last blog post from this house (::sniff::), the next will be from the new one!!!!!
Till next time
xxx
So cute! I'll try making them soon. Good luck and take care!
ReplyDeleteVery pretty! Hope your move goes smoothly.
ReplyDeleteThankyou so much for the great tutorial. I'll add this to my long list of things to try.
ReplyDeleteHope the move goes well :0)
Jacquie x
Yea! Thanks for sharing this with us. I will be making some right away! Good luck with your move.
ReplyDeleteFantastic tutorial! Hope your move goes smoothly. x
ReplyDeleteThank you for sharing! Hope all goes well with your move :) But above all do not stress ;)
ReplyDeleteSee you very soon,
Angie
These are darling, thanks SO much for sharing the pattern. Sending you good thoughts for a smooth move. Best of luck :-)
ReplyDeleteWow thanks for the pattern, I will definately be making these they are so pretty and I am a bit partial to bunting. Hope your move goes well, good luck.
ReplyDeleteThanks so much for the tute. I love these!
ReplyDeleteCindy Bee
Thanks so much for the tutorial with photos. I'm a brand new blogger and love your site. New follower!
ReplyDeleteSuper nice,great tutorial..you are awesome dear,its looking cute
ReplyDeleteThe bunting is so nice, I especially love the fact that it has a flower on top! Love the 3d-effect.
ReplyDeleteWow! I just found your blog. I love your photos and tutorials. Great colors. I so much enjoyed looking through your post. Thanks for sharing. Can't wait to try out the flowers.!
ReplyDeleteLovely,lovely,lovely-- Good luck in your new woolly nest!
ReplyDeleteKindest Regards Linda
Oooh thank you for sharing a tutorial! The bunting is so pretty, especially with the flower center.
ReplyDeletethese are cute! i might make a few to decorate my new desk at work :)
ReplyDeletegood luck with the move and i wish you much happiness in your new home. thanks for the lovely tutorial! x
ReplyDeleteThanks for the pattern - I love bunting!
ReplyDeletesuch a lovely blog, interesting, informative, colourful, and my cup of tea, I wish you happiness in your new home and am very jealous that you now have a sewing room ;) x
ReplyDeleteThank you for sharing, I love your blog.
ReplyDeleteCatherine, Arima.
Thank you very much! Super tutorial!
ReplyDeleteI have been looking for a bunting pattern for ages, since seeing this I have created one set in bright coloured cotton for my (new summerhouse) 60th birthday present in May 2011.
ReplyDeleteI have just started a 2nd set in CK 'ish' colours.
Ooooh, my! I LOVE everything about your beautiuful blog!
ReplyDeleteSo pretty, and a great tutorial. Sorry I haven't done the award thing yet but I will asap. Penny x
ReplyDeleteSuper cute bunting! It is now on my must do list. Thanks for posting the tutorial.
ReplyDeleteGood luck with the move! Thank you for the tutorial, I have been itching to try these!
ReplyDeleteThank you for sharing this pattern I think it is GORJUSS !!! cant wait to have a go later x x x x Jilly
ReplyDeleteThis tutorial is extremely useful. Thanks for sharing.
ReplyDeleteHi Hayley! Your bunting is amazing!!! I grabbed the tutorial at once you have written it here. And today I just made my first triangle! It turns lovely! I've not found any mistakes. Thank you very much!!!
ReplyDeleteOmg the flower was SO hard!!! Took me longer than the triangle lol, I guess I am not good enough :-(
ReplyDeletesuper, de toutes beautées géniale
ReplyDeleteFabulous! this is my next project for adorning my conservatory!
ReplyDeletehai, I have used your pattern for a hat, thank you so much
ReplyDeletehugs jenneke
I completely love this motif - simple but very effective. Just what I wanted for some cheerful bunting :)
ReplyDelete